Τετάρτη 28 Ιανουαρίου 2015

Origami Event


I know that it’s been a while to post here, but I was quite busy.
Last Saturday I have organised an origami event. I have teach the Michael Laffose’s butterfly base, and the possibilities of creating butterflies with that base. 

The event was an absolute success. And because the whole thing was organised for charity, we have collected food and money for people in need. 

I had some of my art exhibited, and I have to confess that it always amaze me to see the reaction of people to origami

10896915 864881273544001 8694295356750568028 n

10540800 864881250210670 3264920721945233984 n

Here’s me teaching...

1939653 10153519137269606 4454928686916976703 n

1970683 864992106866251 2096907771017919569 n

And some happy faces with their butterflies

10690128 10153519137354606 5681299163617325212 n

960277 864899510208844 1902738877622449324 n

And lots of butterflies were folded eventually. So happy for the outcome of this event

10933838 864993403532788 1711968383690331545 n

Παρασκευή 16 Ιανουαρίου 2015

Black Forest Cuckoo Clock

I was asked to organise an event about origami. So, by the end of this month, I will teach how to fold butterflies. The event is to fund an NGO that supports families in need, so we are going to collect food or donate money for the cause. I wanted to have some models to exhibit as well at the event and among my models, I decided to fold models from my favorite designers.

So, one of the origami designers that I love to fold his models, is Dr. Robert J. Lang. I don’t know why, but I really find it easy to understand his folding sequences and fold his models. 

This particular model though, I was always afraid to try. All those details on a single strip of paper 1x10 was too much for me. But I wanted to have one Cuckoo clock hanging on my wall, so I did give it a try.

IMG 0470

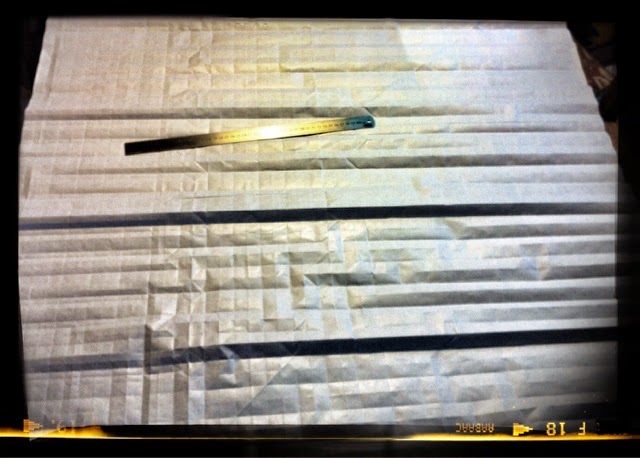
One long strip of Kraft paper is scored 16ths lengthwise and some additional creases were scored on paper.

IMG 0471

Here you can see that the back of the clock and the edges that are later gonna be shaped as leaves, are already collapsed.

IMG 0472

Clock face collapsed too, and the trick part is to handle everything behind the clock that later is gonna be shaped as the cuckoo bird and the deer on top of the clock’s enclosure.

IMG 0473

A drop of PVA glue is necessary to keep the face in position. Mr. Lang is so genius that he has incorporated locking mechanism on this model, but I wanted to be securely glued because later on, I will paint the whole model and I do not want to have accidents ;-)

IMG 0475

Almost ready as you can see. The patina has already been sprayed, waiting now to dry so to do some more shaping.

IMG 0476

And here’s the finished model. Black Forest Cuckoo Clock, designed by Dr. Robert J. Lang. Lots of hours  of folding but I really enjoyed every minute of folding this one. 

Πέμπτη 8 Ιανουαρίου 2015

Shoulder pleats

Today I have started collapsing the bottom part of the body of RyuJin. At first, I was struggle with those pleats. Its a bit tricky to collapse the bottom parts of the pleats. It’s easier when you are using a piece of paper just for those pleats, and gets harder when there is a 2 meters wide piece of paper to handle. 

Anyways, I did manage to collapse the pleats, and i will start shaping the scales in the shoulder area. 

IMG 0468

Τετάρτη 7 Ιανουαρίου 2015

Pre-creasing is done

It took almost three days, but finally every crease is now in place. The easiest part, it's to score the scales, but also the most boring one. I have to say that is quite easy to get lost among the creases in that part, and make a mistake. But, if done, it's easy to hide the wrong crease when the model is finally collapsed. 
Light is not so helpful now, so the collapsing will start tomorrow. 

Τρίτη 6 Ιανουαρίου 2015

Handy tools

When it comes to score the paper, sometimes the best tools are those that you have nearby. In my case, it's an old ball-point pen. I removed all ink residues from the plastic tube container and I have soaked the point-ball for a couple of days in a chloride and vinegar solution. With a help of a metal ruler, scoring the scales, it's really easy now 


Δευτέρα 5 Ιανουαρίου 2015

Phalaenopsis

Today is a special day for me. And I wanted to create a flower scene. And what's best than to fold an orchid!
I have some tissue papers in my collection. I used methyl cellulose to stiffen the paper and when dried, the fun began.


The paper had to be fold in such a way so to get the five petals that this orchid have. When everything got in place, and with some more folds I came to the base.


Now let's fold some leafs for the plant. Again, green tissue paper, and some wiring in the middle.
It will make it easier to shape later.


For me, the best time in Origami is when I start to shape and model. Here you can see the flowers at their final position and pegs are used to keep them in place until the pva glue dries.


And..... Here it is. Phalaenopsis orchid plant is ready and framed. Took me the whole day, but I enjoyed every minute!!!


And some details....

And a butterfly, based on Michael LaFosse's butterfly base


Hope you like it!!!

Orchids

Taking a break from RyuJin I am trying to create some orchids for a new project that I have in mind. By studying Robert J. Lang's and Michael LaFosses's orchids, I came up to this design for a phalaenopsis orchid. I put some varnish now, let's wait and see if it will come out right


Κυριακή 4 Ιανουαρίου 2015

Short transitions

This is how it looks now with all short transitions in place. 

As you can clearly see, the paper now it's much shorter than the beginning. From two meters now it measures about 90cm. The right part of paper would be the tail, while on the left one, the two back feet will emerge. 


This is a needed step so to prepare the paper for the next step, which is to score the creases for the scales. But more details for that, in a future entry.

First entry

My first entry on this blog is something that I am working for almost a year now. 

I am following the lessons of Mr. Origami (Daniel Brown) so to learn how to fold Satoshi Kamiya's RyuJin Dragon. And it was a hell of a journey indeed. A model that needs a two squares meter of paper to fold is breaked down to small parts to understand the way the final model will eventually collapse. 

I am creasing a rectangle of kraft paper now that measures one by two meters to collapse the bottom part of the Dragon. I will be posting photos following the process for this project, hoping that would come to a success at the end

Welcome

New year and I  have decided to start a new blog so to keep a diary on my origami activities.
Welcome to my journey of folding paper and creating art.

Dimmis